Photo Friday: Making a Bad Photo Better
I knew that I probably wasn't going to get the shot but I took it, anyway.
I love long exposures at night, with moving traffic. Cars become invisible or ghostly images, their lights being the only evidence of their comings and goings. If the vehicle is large enough—say, a truck or a bus—the light trails can be more dramatic, as they cover a larger area and appear much higher than they do on a small automobile.
I like going to the various transit stations in our city. I'm guaranteed to see large traffic as long, articulated buses pass through. If I time my shot right, I can get a bus pulling into the station and coming to rest. Its lights make a trail to where it rests, letting passengers off and on, and becoming visible, transparent.
I set up my tripod at the Market Place shopping centre, in Barrhaven, at the intersection of the transitway and Marketplace Avenue, on the southeast corner. Behind me and to my right, was the back of the LCBO; to my left, the massive Loblaw's. The transit station was dead ahead, but I turned the tripod to face kitty-corner to the intersection. I was hoping to capture cross-traffic, the lights of both buses and automobiles colliding.
As soon as my camera was mounted and composed, I had planned to check the exposure and prepare for a test shot when two buses approached from behind. Without getting a chance to see if my exposure was right, I took the shot.
For this outing, I had decided to use my 10-20mm lens, which covered the field of view nicely. But because I didn't have time to make any exposure adjustments, I ended up taking a 15-second exposure at an aperture of f/9.5, with the ISO set at a generous 800. The last time that I had used my camera had been two nights before, on Hallowe'en, to capture the jack-o-lanterns on my front steps. For those shots, I had cranked the ISO because I wasn't using my tripod. After I had taken those shots, I forgot to set my camera back to 100 ISO, where I typically keep it.
I always forget to reset my camera after I use it. I really have to break myself of this bad habit.
On that prior shoot, I had even set the EV at –1.0, to push the exposure for hand-holding and to ensure that the aperture-priority setting didn't overcompensate for the low light. In retrospect, that was a help to the shot I was currently taking, but not nearly enough of an underexposure to make a difference.
After the 15 seconds was over, I saw the image in my viewer. There wasn't much to see, as the entire image was grossly washed out. Overexposure was an understatement.

When I returned home to process my photos for my daily project, I never even considered that first shot because of what I had seen on my camera's viewscreen. The required effort to recover it, I convinced myself, would take far longer than it would take to simply use one of the images that had been properly exposed (all I did, to compensate for the exposure, was to return the ISO to 100: all the other settings remained the same for my subsequent shots).
Last week, as I scanned through my stored images, searching through my favourite shots of this past year, in preparation for my traditional, end-of-the-year post, I took a peek in the folder for POTD 306 and saw that overexposed image again. I was going to delete it, knowing that I would never use it, but then my curiosity got the better of me. I was certain that Snapseed wouldn't have been able to recover the blown-out areas of the shot, but what about my other photo-editing software, my number-one go-to program that has been largely neglected this year because of my project?
What about PaintShop Pro? Could PSP bring this photo to life?
There was only one way to be sure.

Like many photo-editing tools, PSP comes with a RAW-format correction feature, called its Camera RAW Lab, which lets you recover over-exposed highlights and make other basic and lens corrections.
From the Highlight recovery list, I selected the Balanced option, which brought some of the washed-out parking lot into view. There was much more work to do, but this was a promising start.

Early in my POTD project, I noticed some dirt marks that would appear on the same place on every photo. Even if I changed lenses, the spots would show up, though, on my 70-300mm lens, when it was at its maximum magnification, these spots would also become enlarged and would appear washed out. The problem was not with any of my lenses but with the camera body, itself.
I've tried cleaning my camera a few times, blowing it with compressed air or setting the automatic sensor cleaner, but those spots have remained stubbornly fixed. Because I need my camera for my POTD project, I can't afford to send it away for a professional cleaning, potentially keeping away from me for a week or so.
Instead, I've used the Makeover Tool, in PSP, and the Healing feature, in Snapseed, to manually remove the spots any time they stand out. They only appear when they're part of the sky, when there's to subject to cover them up.
The Makeover Tool is one of the first ones that I go to when editing a photo. I use it extensively for my model shoots, when I want to remove any blemishes from otherwise smooth skin. The tool in PSP is superior to the one in Snapseed, as the Healing feature tends to leave dark areas more pixellated after a spot is removed. The PSP tool is much better at blending the touched-up mark into the surrounding area.
The spots were clearly visible but after a few clicks, they were completely gone. The most challenging spot to remove was located within a lens flare that was caused by a street lamp, but I was able to make that flare look natural once the spot was gone.


The next step was to darken the image and create more contrast. If the colour from the bus taillights were to pop out in the final steps, I'd have to make the sky turn from a muddy grey to pure black.

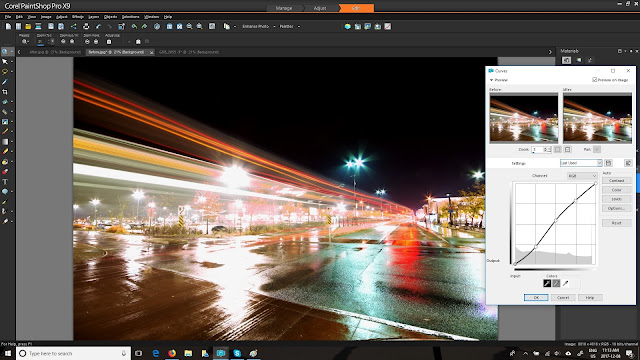
Another tool that I like to use to adjust the brightness on a colour channel is the Curves tool. I just drag various points on the line to lighten or darken areas in the image. I use this tool more than the Brightness/Contrast tool.
Next, I wanted to make the red and amber lights from the bus pop, so I boosted the vibrancy. Usually, I'll increase the colour vibrancy by no more than 10 or 20 percent, but the light streaks were calling out for more, so I shot it up to 50 percent.

Finally, I cropped the photo with a 16:9 ratio, to eliminate some of the dead, night sky, and the roadway immediately in front of me.

I was tempted to use another feature, the Digital Noise Reduction tool, but I sometimes find that this feature can soften an image, and I wanted to keep the light trails as sharp as I could. (I sometimes also use the sharpening tool, but the PSP tool doesn't give me as much control as the one in Snapseed.
The final photo looked way better than when I first saw it on my camera's viewscreen, and it changed a file that I was going to delete into an image that was worth keeping. And while the photo that I used for my POTD was ultimately a better shot, in that I captured light trails of automobiles crossing with lights from a bus, editing a photo with PSP will always beat a photo that is edited in Snapseed.

Happy Friday!
I love long exposures at night, with moving traffic. Cars become invisible or ghostly images, their lights being the only evidence of their comings and goings. If the vehicle is large enough—say, a truck or a bus—the light trails can be more dramatic, as they cover a larger area and appear much higher than they do on a small automobile.
I like going to the various transit stations in our city. I'm guaranteed to see large traffic as long, articulated buses pass through. If I time my shot right, I can get a bus pulling into the station and coming to rest. Its lights make a trail to where it rests, letting passengers off and on, and becoming visible, transparent.
I set up my tripod at the Market Place shopping centre, in Barrhaven, at the intersection of the transitway and Marketplace Avenue, on the southeast corner. Behind me and to my right, was the back of the LCBO; to my left, the massive Loblaw's. The transit station was dead ahead, but I turned the tripod to face kitty-corner to the intersection. I was hoping to capture cross-traffic, the lights of both buses and automobiles colliding.
As soon as my camera was mounted and composed, I had planned to check the exposure and prepare for a test shot when two buses approached from behind. Without getting a chance to see if my exposure was right, I took the shot.
For this outing, I had decided to use my 10-20mm lens, which covered the field of view nicely. But because I didn't have time to make any exposure adjustments, I ended up taking a 15-second exposure at an aperture of f/9.5, with the ISO set at a generous 800. The last time that I had used my camera had been two nights before, on Hallowe'en, to capture the jack-o-lanterns on my front steps. For those shots, I had cranked the ISO because I wasn't using my tripod. After I had taken those shots, I forgot to set my camera back to 100 ISO, where I typically keep it.
I always forget to reset my camera after I use it. I really have to break myself of this bad habit.
On that prior shoot, I had even set the EV at –1.0, to push the exposure for hand-holding and to ensure that the aperture-priority setting didn't overcompensate for the low light. In retrospect, that was a help to the shot I was currently taking, but not nearly enough of an underexposure to make a difference.
After the 15 seconds was over, I saw the image in my viewer. There wasn't much to see, as the entire image was grossly washed out. Overexposure was an understatement.

When I returned home to process my photos for my daily project, I never even considered that first shot because of what I had seen on my camera's viewscreen. The required effort to recover it, I convinced myself, would take far longer than it would take to simply use one of the images that had been properly exposed (all I did, to compensate for the exposure, was to return the ISO to 100: all the other settings remained the same for my subsequent shots).
Last week, as I scanned through my stored images, searching through my favourite shots of this past year, in preparation for my traditional, end-of-the-year post, I took a peek in the folder for POTD 306 and saw that overexposed image again. I was going to delete it, knowing that I would never use it, but then my curiosity got the better of me. I was certain that Snapseed wouldn't have been able to recover the blown-out areas of the shot, but what about my other photo-editing software, my number-one go-to program that has been largely neglected this year because of my project?
What about PaintShop Pro? Could PSP bring this photo to life?
There was only one way to be sure.

Like many photo-editing tools, PSP comes with a RAW-format correction feature, called its Camera RAW Lab, which lets you recover over-exposed highlights and make other basic and lens corrections.
From the Highlight recovery list, I selected the Balanced option, which brought some of the washed-out parking lot into view. There was much more work to do, but this was a promising start.

Early in my POTD project, I noticed some dirt marks that would appear on the same place on every photo. Even if I changed lenses, the spots would show up, though, on my 70-300mm lens, when it was at its maximum magnification, these spots would also become enlarged and would appear washed out. The problem was not with any of my lenses but with the camera body, itself.
I've tried cleaning my camera a few times, blowing it with compressed air or setting the automatic sensor cleaner, but those spots have remained stubbornly fixed. Because I need my camera for my POTD project, I can't afford to send it away for a professional cleaning, potentially keeping away from me for a week or so.
Instead, I've used the Makeover Tool, in PSP, and the Healing feature, in Snapseed, to manually remove the spots any time they stand out. They only appear when they're part of the sky, when there's to subject to cover them up.
The Makeover Tool is one of the first ones that I go to when editing a photo. I use it extensively for my model shoots, when I want to remove any blemishes from otherwise smooth skin. The tool in PSP is superior to the one in Snapseed, as the Healing feature tends to leave dark areas more pixellated after a spot is removed. The PSP tool is much better at blending the touched-up mark into the surrounding area.
The spots were clearly visible but after a few clicks, they were completely gone. The most challenging spot to remove was located within a lens flare that was caused by a street lamp, but I was able to make that flare look natural once the spot was gone.


The next step was to darken the image and create more contrast. If the colour from the bus taillights were to pop out in the final steps, I'd have to make the sky turn from a muddy grey to pure black.

Another tool that I like to use to adjust the brightness on a colour channel is the Curves tool. I just drag various points on the line to lighten or darken areas in the image. I use this tool more than the Brightness/Contrast tool.

Next, I wanted to make the red and amber lights from the bus pop, so I boosted the vibrancy. Usually, I'll increase the colour vibrancy by no more than 10 or 20 percent, but the light streaks were calling out for more, so I shot it up to 50 percent.

Finally, I cropped the photo with a 16:9 ratio, to eliminate some of the dead, night sky, and the roadway immediately in front of me.

I was tempted to use another feature, the Digital Noise Reduction tool, but I sometimes find that this feature can soften an image, and I wanted to keep the light trails as sharp as I could. (I sometimes also use the sharpening tool, but the PSP tool doesn't give me as much control as the one in Snapseed.
The final photo looked way better than when I first saw it on my camera's viewscreen, and it changed a file that I was going to delete into an image that was worth keeping. And while the photo that I used for my POTD was ultimately a better shot, in that I captured light trails of automobiles crossing with lights from a bus, editing a photo with PSP will always beat a photo that is edited in Snapseed.

Happy Friday!
Comments
Post a Comment